I promised to write a helpful blog post, so here it is. Sorry, not about writing this time, but since I’ve been busy digital painting, I thought I’d share this.
A few have asked me: how does a girl who cannot even draw a proportionally correct stick figure produce these paintings? Well, with desperation, a dash of imagination, and the right tools, anyone can create anything. Really. I will attempt to show you how here.
Months ago, I hired an artist friend Mike to draw pieces for my book’s website. He did an awesome comission on Faziel. I fell in love with it right away and ordered Haisma and Jebeyan next. It took a while but he did finish Jebeyan (and it’s absolutely gorgeous too). Though he had trouble drawing Haisma. I was devastated when he pulled out of the project.
Then my husband, who’s a fantastic artist himself, offered to help out. I’m grateful, but the reason why I didn’t ask him in the first place was because he’s… very slow when it comes to these things :p And he IS. He started four pieces which to date have not reached completion, ha. But I watched as he did these, on his beloved Ipad using this fantastic program called Procreate. It’s cheap. I got it for $2.99 (the cost of an e-book!) but they often do promotional bargains, it goes down to as low as 99cents. Anyway, I began attempting a few myself. The results were atrocious :p but I kept trying.
Fed up with me stealing his Ipad all the time, he urged me to buy my own. So I did. I never parted with it since. Left to (with?) my own device(s), I went berserk and produced countless drek before I grasped the trick. Without further ado, let me show you.
1) Because I’m drawing for my book, I usually have some idea already on how the scene should look like in my head. A true artist may draft this scene on a piece of paper, but I ain’t that talented and have to fake it. When I worked with Mike, he always asked for reference poses he could draw from, so I do the same now, google photos of poses, items, background, texture, etc. as required by the scene in mind. Below are the references I collected for the artwork I recently finished.

2) After deleting the bits I don’t need, I use the transform tool in Procreate to lay them all out as per the scene in my head. To make life difficult, I have specific faces to match my characters, which means I often can’t use the faces that come with the reference poses. Some ‘surgery’ is usually needed (see Faz below). I don’t always manage to find the exact poses either, but it doesn’t matter, I just improvise. The important thing is to know exactly what you’re trying to capture, I suppose. For me, the most important element is always Faziel’s abs, but feel free to disregard such fascination. :p Below is what the references look like after the lay out. Btw, I deleted the eyes because they’re not looking the right direction. I fix these later.

3) If you’ve a tablet or are mad enough to attempt drawing with a mouse, Photoshop actually does the job just as well for this bit. I possess no tablet and am pretty sane last I checked, so I use the cheapo Procreate. I add a new layer on top of the lay out photo, and copy the outline. Just some rough guidelines so I know how and where things should be. Below is what the outline piece looks like.

4) The next step is my favourite, brings back childhood memories, you see: I get to colour these in. The great thing about Procreate is it allows you to pick the colours you want by simply pressing your fingers on any section in the photo, and modifying the hue levels via the colour navigation tool. It makes it easy for me to achieve the right tone levels and shades for what’s needed. I also draw the eyes here, and try to manipulate where they’re staring, etc. Below is what it looks like after I’m done playing four-year-old.

5) This step is the hardest for me to get right. If I never saw Stephanie Valentin’s youtube tutorials or Glenn doing it himself, I wouldn’t have a clue how to do it. Let’s call this step: shadows and lighting. The way I do this is by going back and forth between the layer I draw on and the photo reference, and copy where/how the shadows and light fall upon the object. In Procreate (as well as Photoshop) you can manipulate the colour transparency. For shadows I find tranparent black (about 10-20%) works best. For light reflections, I use 50-60% very fair cream and then smudge it down using the smudge tool. But you shouldn’t follow the reference blindly, because the pics come from different sources where light and shadows that fall on the objects may not match. I usually pick just one object, and imagine where the source of light may be in the scene based on the fair and dark tones on that object. I then apply the same shading with all other objects accordingly. This sounds harder than it is but it isn’t, once you get the hang of it. Smudge tool is your friend. So are brush size and transparency levels. After that, add in the details as in the book: shirt, pants, braids, sickles… Remember, every bit counts, goes a long way in merging the image described in the book to the one you’re portraying. Below is what it looks like after the shadows and details are applied.

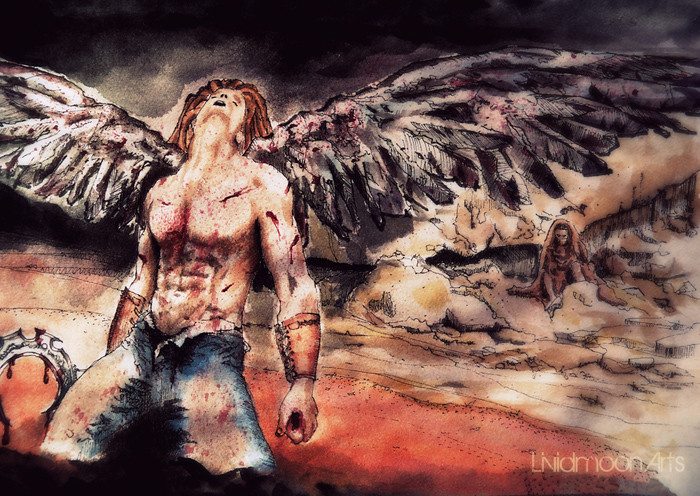
6) The last bit is just a Lyd thing but I usually try to enhance the colours and adjust the highlight levels the way I do photo manipulations. You can use Photoshop for these, but Picnik is my preferred tool (and it’s free). I switch between Orton, Lomo, and Cross Process of different levels, but you can play with other effects as well to achieve the look you’re after. Focal blur is good too, for creating that camera depth of field effect. This is the final look.

The plan was to have a few paintings for the book’s website, but to date, I’ve drawn 28, some very basic and most not completely finished, but all portray what the chapters need nonetheless. My average productivity rate is a painting per two days. I think I’ve hope to draw one for each chapter (that means a total of 50, whoa!) as long as I continue at this rate and in this spirit.
Did that answer your question? As the blurb on the top of my website says: creativity is contagious. I hope to pass on the virus so all of you, artists or not, may be inspired to give it a go.
And yes, I haven’t stopped tweaking with the book and the query either. I don’t know when I’ll ever reach that point when I’m satisfied with everything, but as long as the steam’s still there, I am running.
Happy creating, peeps and thanks for the visit!

Leave a Reply